How to Create a Facebook Shop in 5 Simple Steps? An Ultimate Retailer Guide
Basic Knowledge About Facebook Shop
Selling on Facebook is not a newly emerged term. Since its very first days, Facebook has always supported what people envisioned as social commerce. Knowing the fundamentals of Facebook Shop, including the definition, requirements, features, and cost of having one, will have you fully prepared for selling on this platform before learning how to start an online boutique on Facebook.
What is a Facebook Shop?
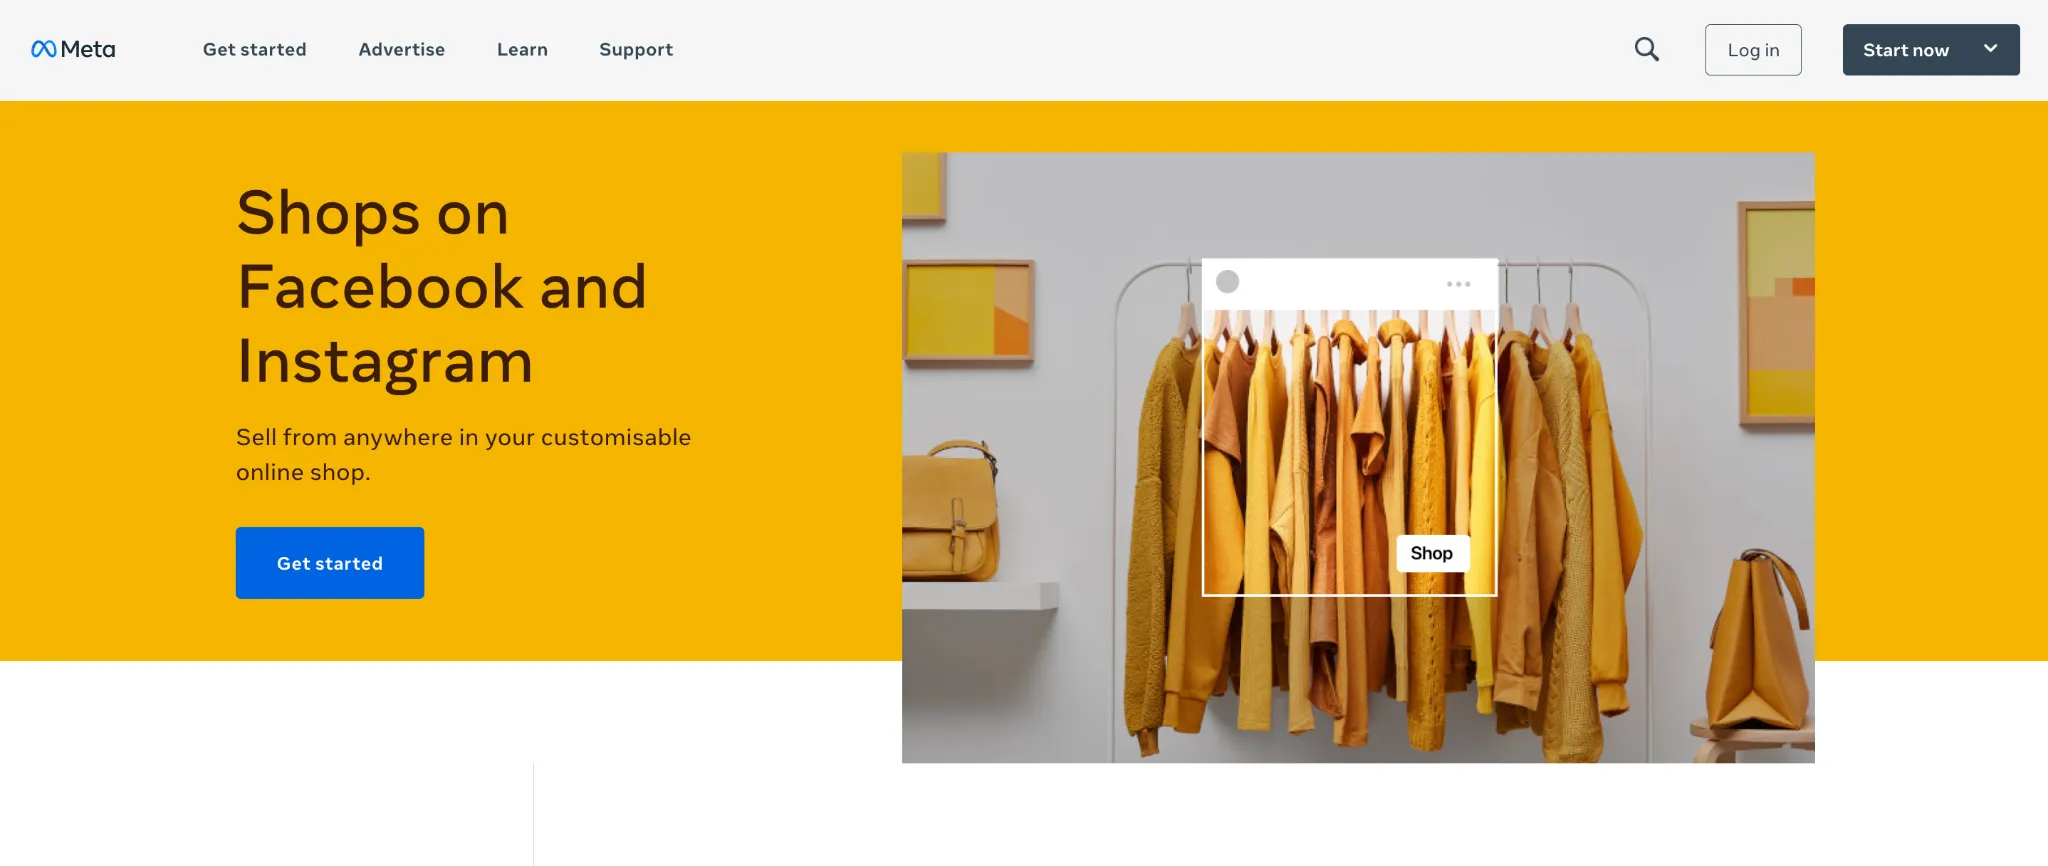
Facebook Shop is known as an additional feature that works in conjunction with Facebook Fanpage (or Facebook Page). With the help of Facebook Shop, potential buyers will see your products in their newsfeed and purchase directly from Facebook or your current eCommerce platform. In other words, Facebook Shop is the best way to sell on Facebook since it improves the shopping experience on Facebook and increases sales volume for Facebook Shop owners.
Facebook Shop requirements
With that being said, not everyone can take the advantage of Facebook Shop. Until now, only businesses located in supported areas can access and use this amazing feature to grow their sales volume.
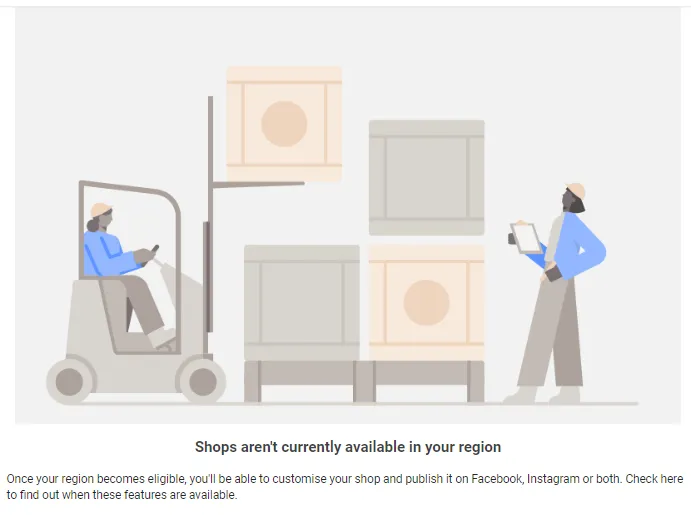
If you live in Canada, the United Kingdom, or certain countries in LATAM (Latin America area), EMEA (Europe, the Middle East, and Africa), and APAC (Asia Pacific), you can go ahead and create a Facebook store.
On top of that, your business has to meet other Facebook commerce eligibility requirements to be able to operate a Facebook store normally:
- Comply with Facebook Terms of Service and Community Standards.
- Represent your business and complete domain verification.
- Maintain a sufficient follower base.
- Provide accurate information and follow best practices.
Facebook Shop: Cost & features
When you’re fully aware of Facebook Shop requirements, let’s find out about its features and cost to see if it’s worth learning how to start an online boutique on Facebook.
Cost of a Facebook Shop
It is always free and convenient for business owners to create their own Facebook boutiques. However, Facebook applies a per-transaction charge to all checkouts on your platform, which is called the selling fee. This fee is to cover taxes and payment processing costs and will be automatically removed from your compensation when buyers make a transaction through your Facebook Shop.
According to Facebook, the selling fee is a flat fee of 40 cents for shipments of $8 or less, or 5% per shipment. If a purchase costs $5, for example, the selling fee is a flat 40 cents. Nonetheless, for a $10 bill, the selling price will be 50 cents.
When you use Commerce Manager to open a Facebook Shop, the mentioned costs will be applied to all transactions on both Facebook and Instagram. In the event that a client files a chargeback, the fees may be levied to your account. Facebook then will put the transaction on hold until the dispute is resolved. For more details, please refer to this Facebook Shop fee guide.
Facebook Shop features
Serving as an eCommerce platform, Facebook Shop offers several outstanding features which considerably boost small-sized businesses.
- Unlimited product addition: Facebook Shop allows you to add as many products as you can.
- Product inventory customization: The searching item process will be easier since sellers can group products under different categories.
- Customer communication: Merchants can put in touch with their customers through messages.
- Insights acquisition: Views, clicks, and purchases for each product are reported.
How to Start an Online Boutique on Facebook?
Now that you’ve learned the basics of Facebook Shop as well as the benefits and drawbacks of having one. Let’s get right into the next step, where we’ll show you how to start an online boutique on Facebook in as much detail and simplicity as possible. You are now just 4 steps away from creating a store on Facebook!
#1. Set up a Facebook Shop
In this step, you will learn how to create a Shop page, set up the Shop details, and sync a partner platform (if any).
Create your shop page
If you don’t know how to start an online boutique on Facebook, there are 2 possible ways for you to choose:
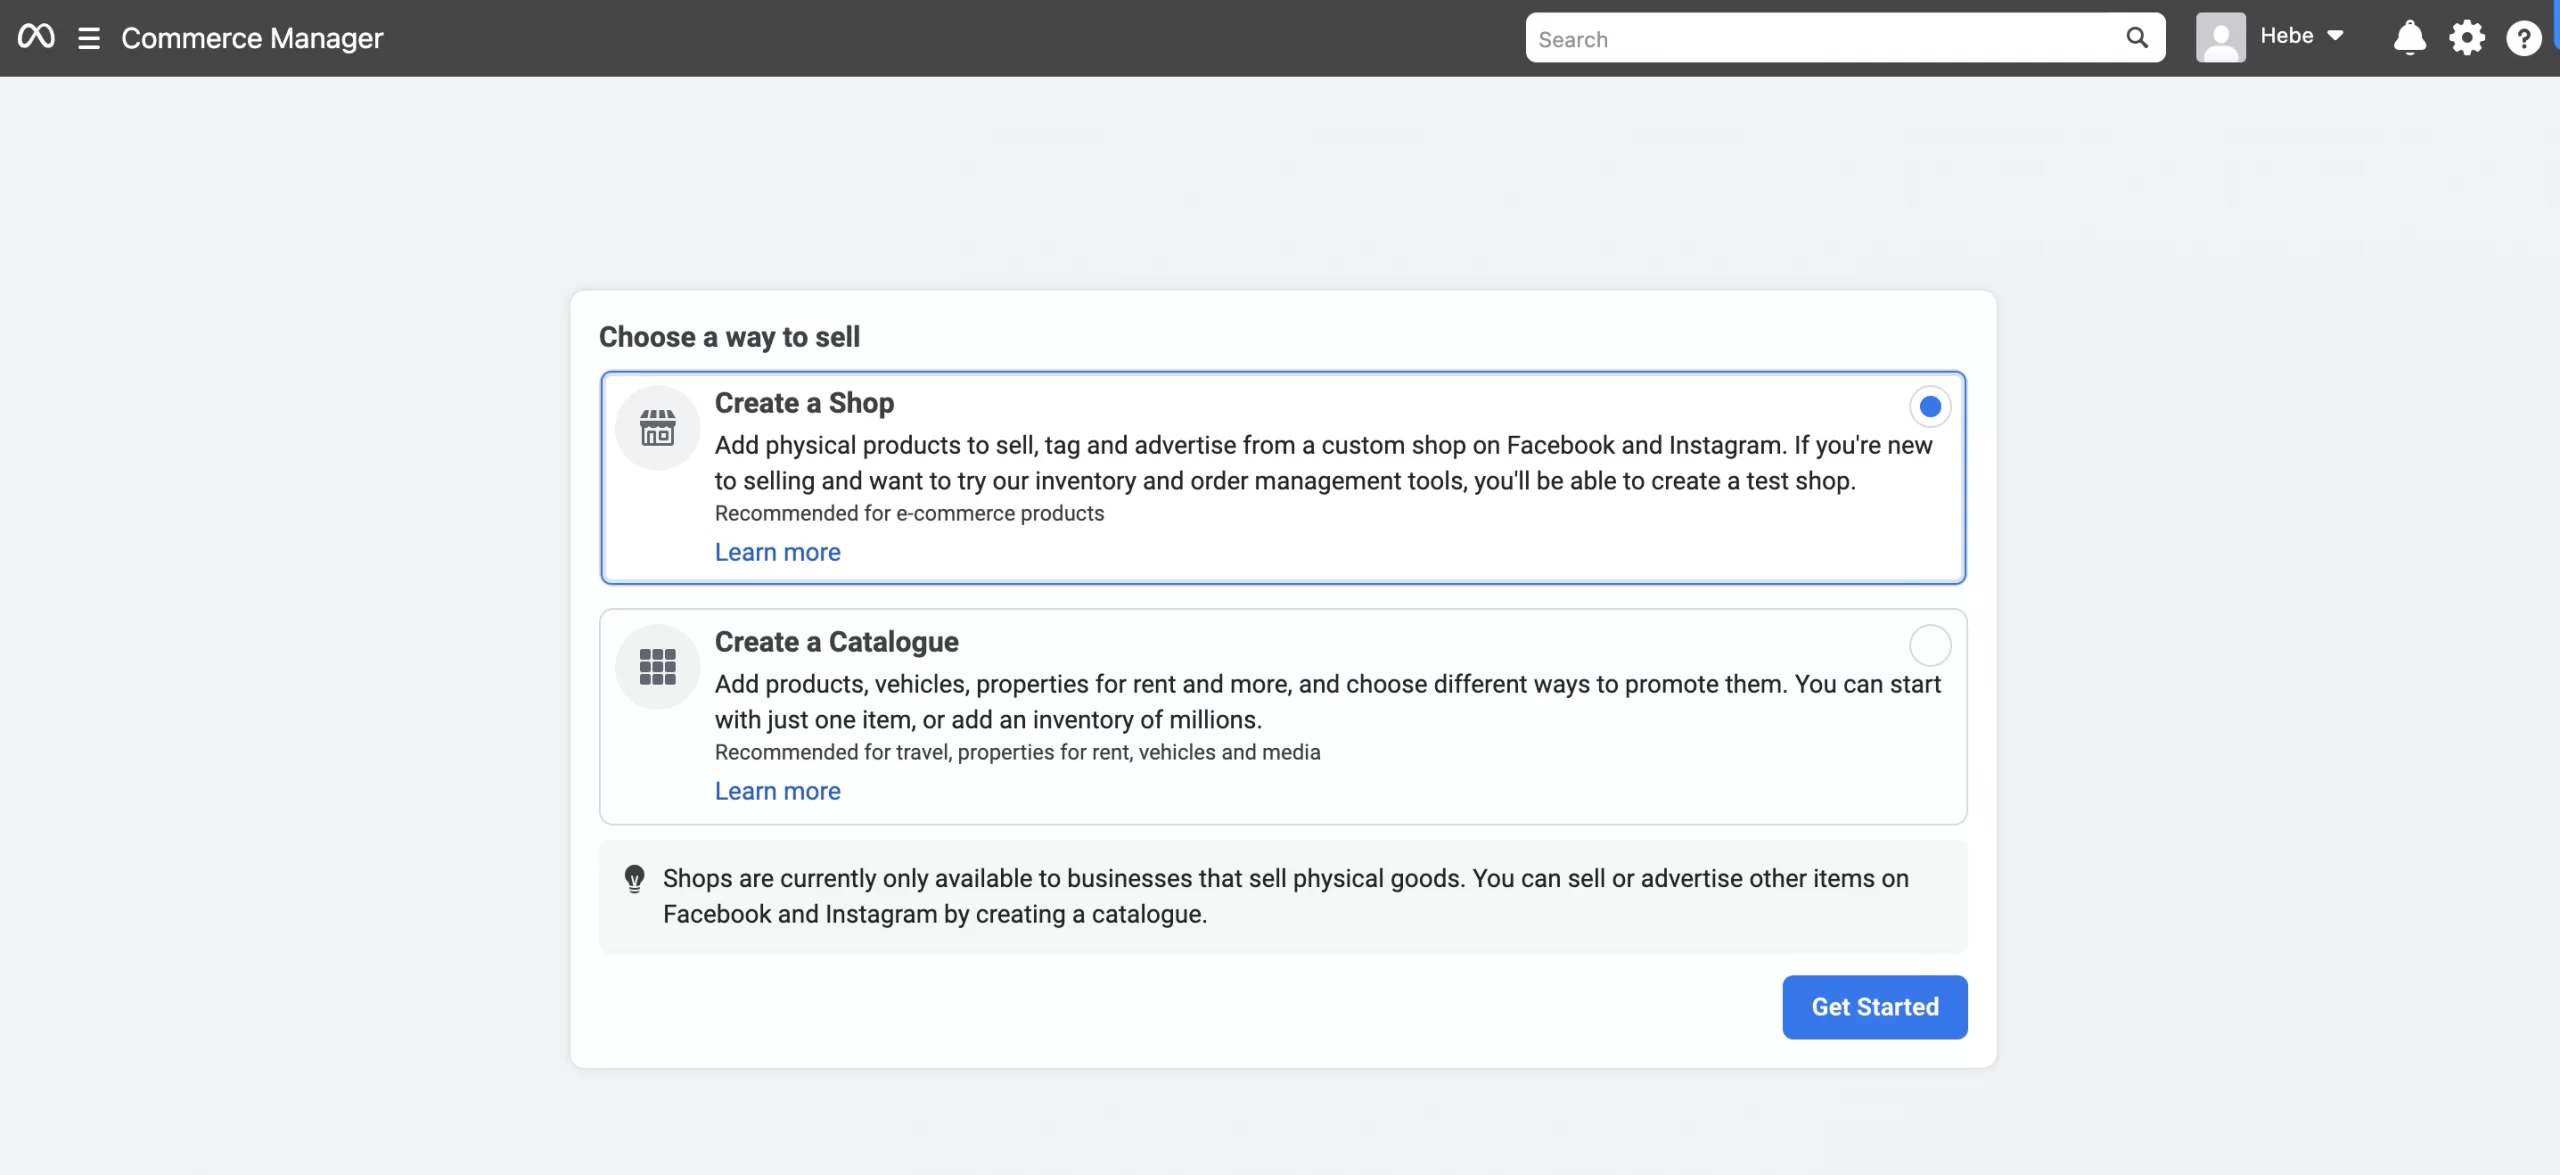
- Using Facebook Commerce Manager: If you already owned a Facebook Page, you can convert them to Facebook Shop with Commerce Manager. Otherwise, you should go ahead to create a Facebook Business Page in advance.
- Via eCommerce platforms: If you are selling on other eCommerce platforms (such as Shopify, BigCommerce, or WooCommerce), install the app from the app stores to link your Facebook account with the current eCommerce sites. You can also use multichannel listing software to manage your business across multiple sales channels.
Create a Facebook Shop using Commerce Manager
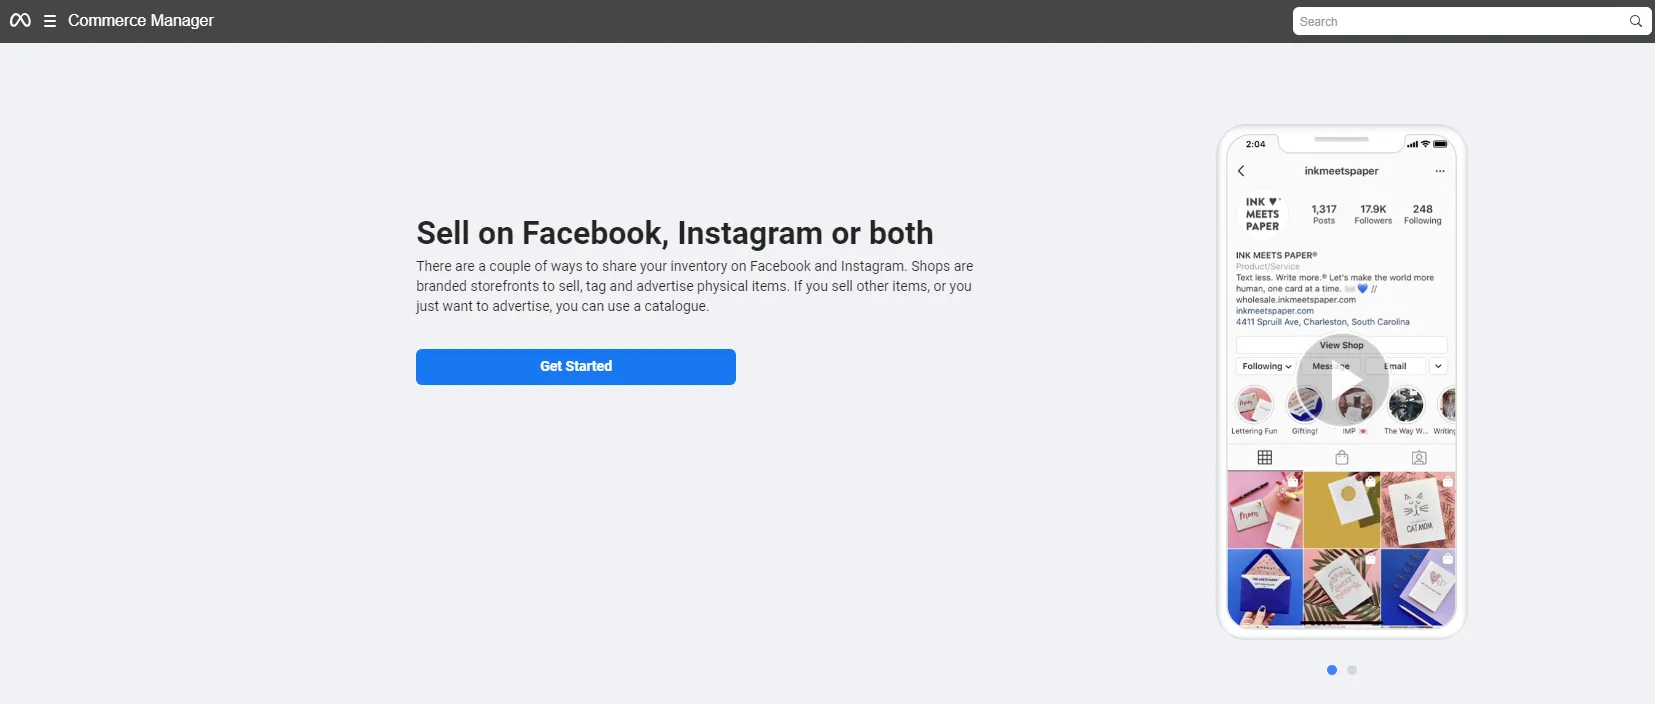
Facebook Commerce Manager serves as the hub for all of your selling activities across Facebook and Instagram. From here, you are able to manage product catalogs, view sales activity, and enable checkouts at ease after learning how to start an online boutique on Facebook.
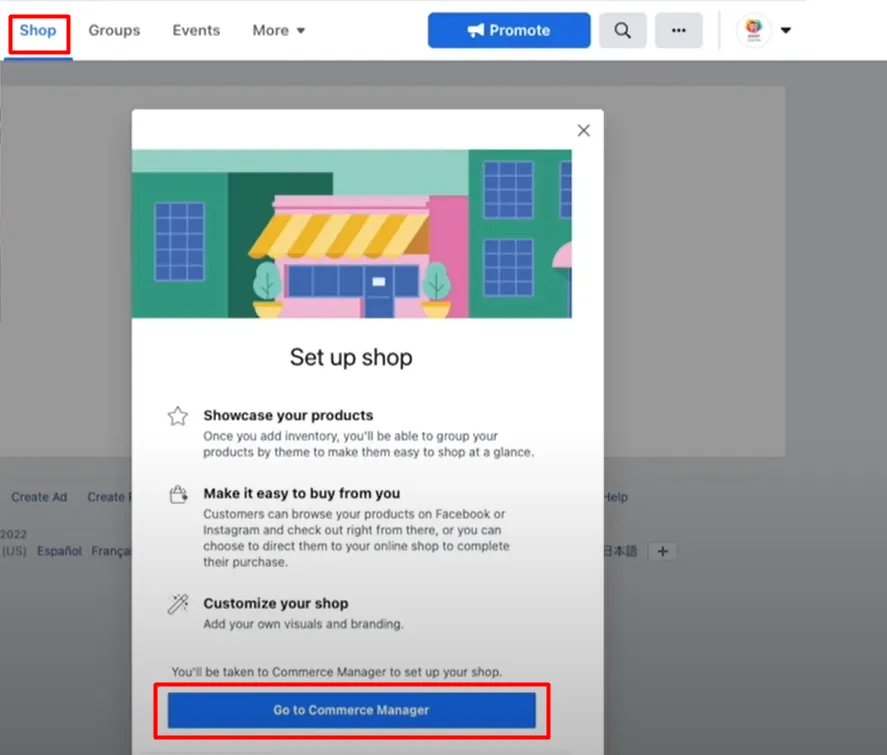
Go to your Facebook Business page, then click on the shop tab on the left side. Bear in mind that you must have admin credentials to be able to do this. In case you cannot find or don’t know how to get the button Shop on your pages, you can change the Page template by choosing More → Edit Tabs and enabling the Shop option.
Create a Facebook Shop via eCommerce platforms
Things will be a bit different if you already own an eCommerce site and want to start there. Let’s learn how to start an online boutique on Facebook via an eCommerce platform right below.
First, go to your eCommerce site and find the app to link your Facebook account with your current store. Next, log in to the app with your preferred Business Manager account. From this stage onwards, you can follow the instructions on how to create a Facebook Shop with Facebook Commerce Manager.
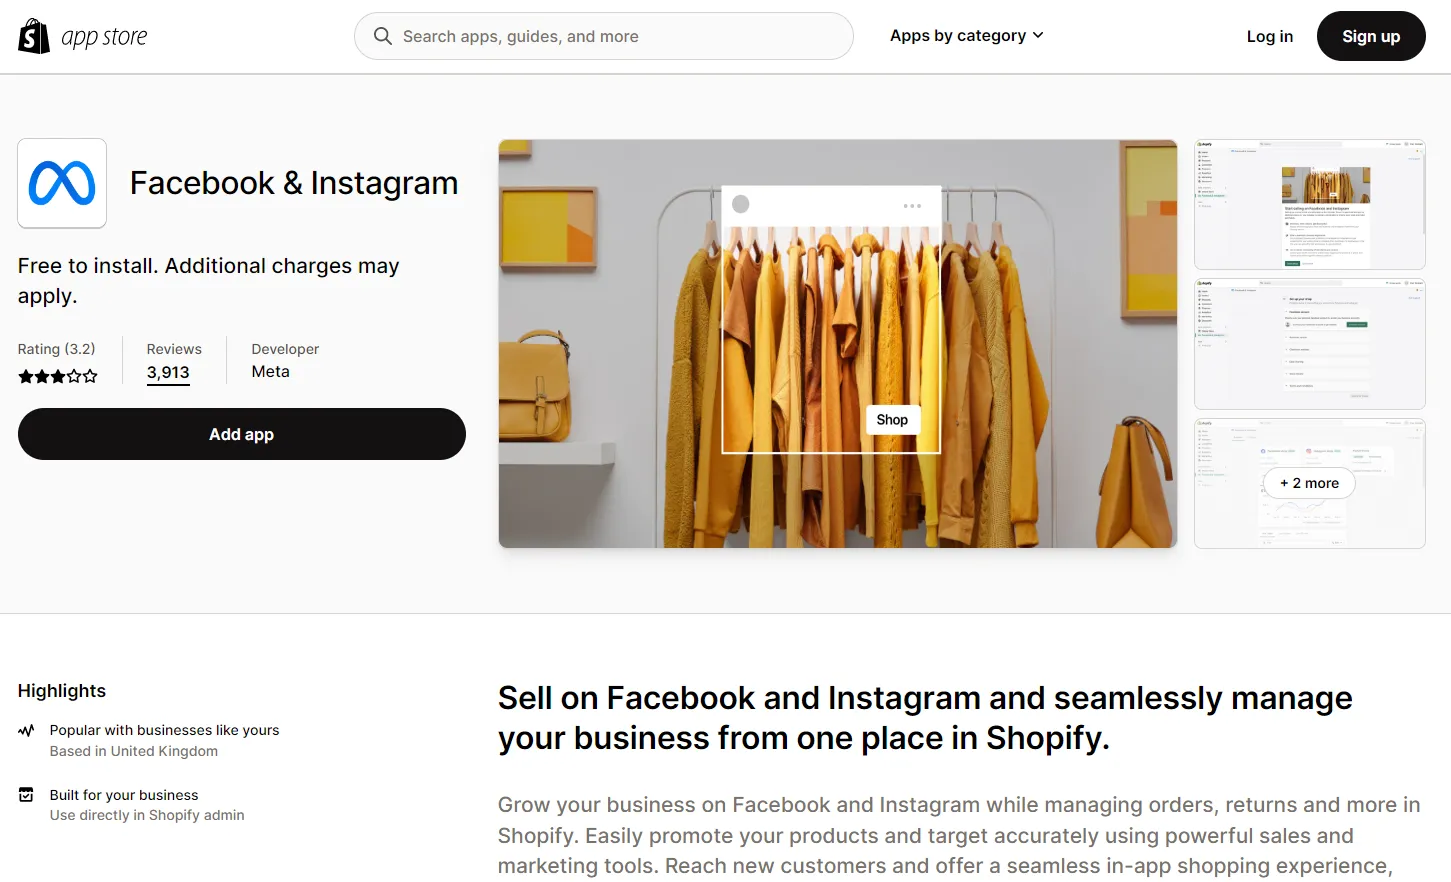
If you are currently running a Shopify store, you can go to Shopify App Store and add Facebook & Instagram app. This application is developed by Meta and is completely free to install. After that, log into the app with your Facebook account, and continue to create your Facebook online store with Commerce Manager.
Set up your Facebook Shop details
The steps in this stage may vary depending on your location. If your business base is in the US, follow the instructions below:
- Click on the Shop tab then hit on the Go to Commerce Manager button once you’ve finished reading the pop-up details.
- After that, provide the necessary business information.
- Enter your state and TIN (Tax Identification Number). You are able to skip the latter if you don’t have one at the moment, but make sure to come back and provide the details.
- Specify the products you plan to sell.
- Answer all required questions about your business information.
In case you are located outside of the US, the process will be a bit different. Firstly, you also need to provide the details about your business and read & agree to the Merchant Terms. The main difference here is how you choose to ship the orders out to your customers: Message to Buy or Checkout on another website.
Sync a partner platform
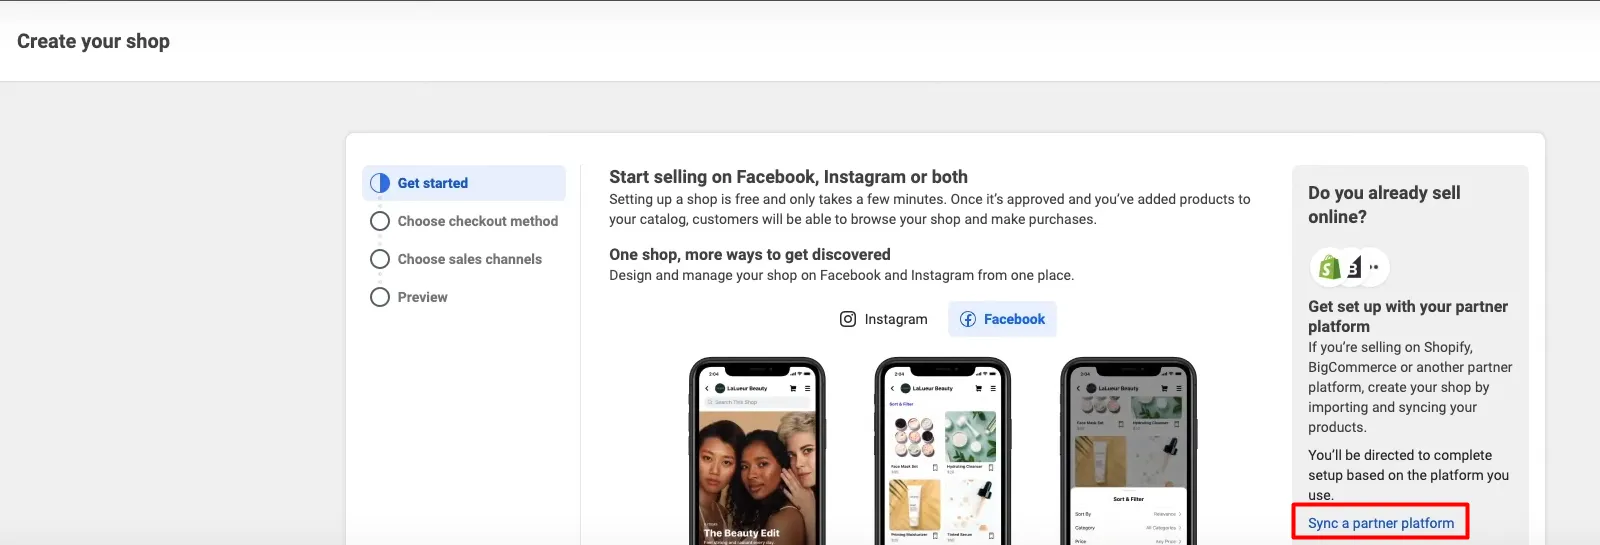
If you forgot to create your Facebook store via the current eCommerce site, you are still able to import and sync your products to the newly created Facebook store. Click Sync a partner platform button on the right-hand side. You will be redirected to the eCommerce site where you finish the syncing process.
You can always opt for a multichannel solution to help you manage your inventory, orders, and listings… while taking advantage of all sales opportunities that can happen outside your central channel. LitCommerce Facebook Shop integration can assist you in multichannel selling, efficiently and successfully. It’s also possible to connect with Etsy, eBay, or Google with bulk product uploads, real-time notifications, simple order administration, inventory synchronization, and a variety of other capabilities.
#2. Configure your Shop
Next, we will configure your Shop by choosing a payment method, setting sales channels, and adding shipping/returns options before reviewing the details of your Shop.
Select payment methods
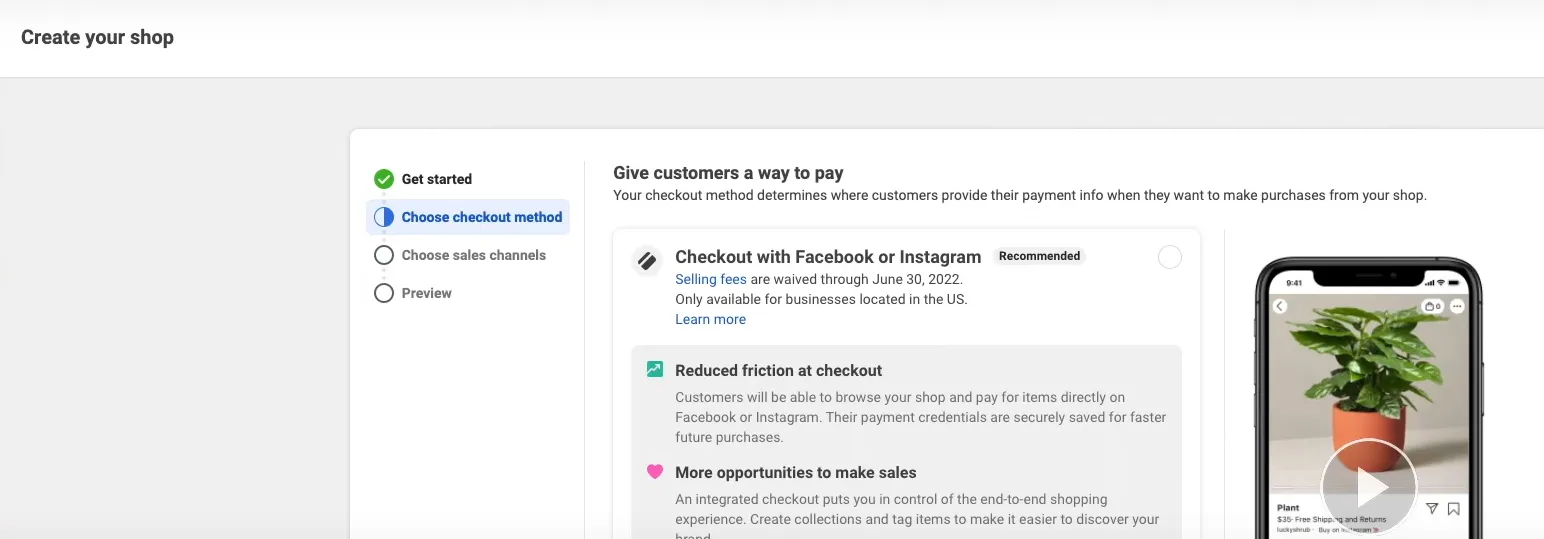
We’ll move to the next part when you configure payment methods for your Facebook store. There are 3 checkout methods for your consideration: your own website, Facebook or Instagram, and via direct messages.
1. Checkout with Facebook or Instagram
This option is only available for US-based businesses. Besides having a US bank account and US business address, you will be able to set up your shop with Facebook check-out if you meet the following requirements:
- Own a Facebook Page and catalog in the same Business Manager.
- Have Manage permissions for your Page.
- Able to manage catalogs in the Business Manager.
- Have a commerce account connected to your Facebook Page and catalog. This account will be created automatically when you set up your shop for the first time.
2. Checkout on your current website
If you are running a website as the main channel for your online business, this will be an optimal option to manage your cash flow. To direct your customers to check out on your own eCommerce site, you need to meet the below requirements:
- Be a Business Manager admin.
- Own your Facebook Page and catalog in the same Business Manager.
- Have Manage Page permissions for the Page and Manage catalog permissions for the catalog in Business Manager.
3. Checkout via direct messages
If these mentioned checkout methods do not work for your business, you can consider directing your buyers to complete their payment via Messenger or WhatsApp chat. With this option, you don’t need to set up any checkout method for your shop. Instead, you have to set up your own way to process payments and fulfilling orders.
4. Checkout via Shop Pay from Shopify
When you set up a Facebook store, the option to pay out via Shop Pay by Shopify will be automatically turned on. You can always turn it off anytime if you want your buyers to use other methods of payment.
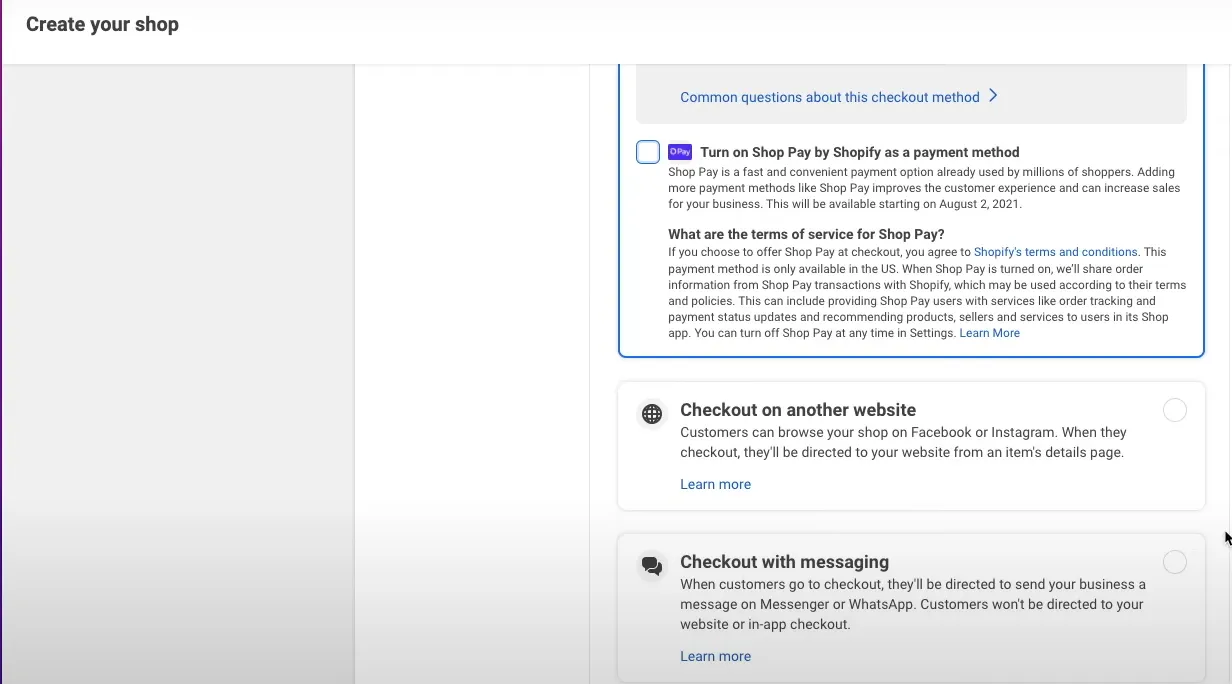
Once you’ve figured out a favorable payment method, click Next to move on to the next step.
Set up your sales channels
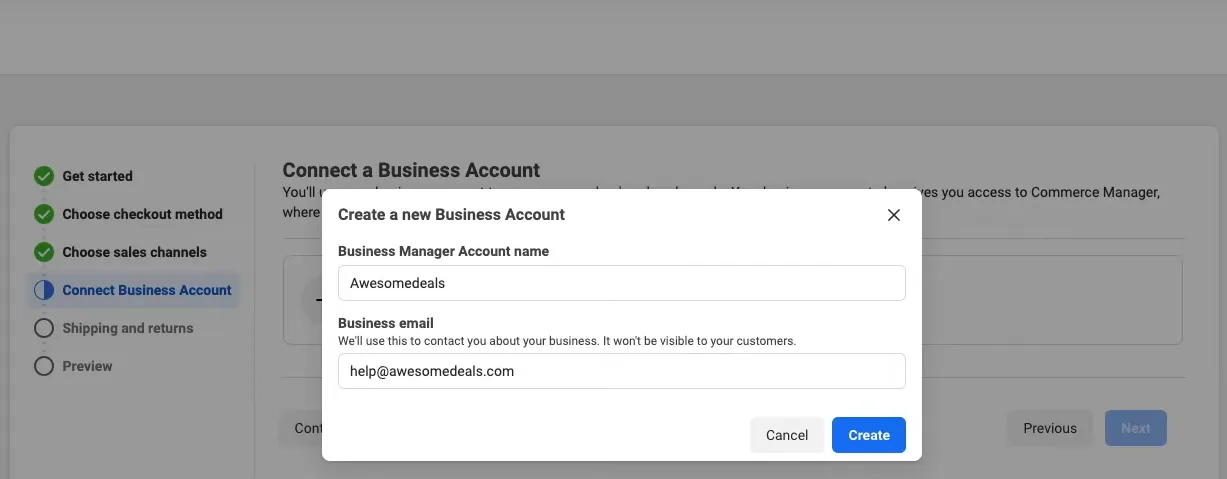
In this step, you can either choose the current Facebook Business Page or create a new one to sell your products. Click Next then choose a Business Manager account to continue with the process.
In case you don’t have a Business Manager account, don’t freak out yet. You can create one in this step by filling in the necessary information such as Business name and Business email. Click Create to save the changes.
Add shipping and return options
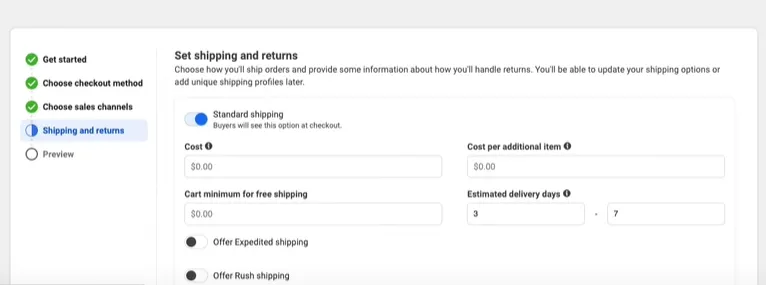
There are three options for shipping: Standard, Expedited or Rush shipping. Each of them can be figured with different sets of shipping costs, additional charges, and estimated shipping days. You can also offer free shipping as a unique selling point for your business by setting up the cart minimum.
It’s also necessary to set up a return window that corresponds to your shipping and return policy. Every Facebook Shop is required to offer a minimum window of 30 days, calculated from the day the items are delivered to the customers. Fill in an email address as the hub for customer support, then click Next to save the information you’ve just entered.
Review your shop details
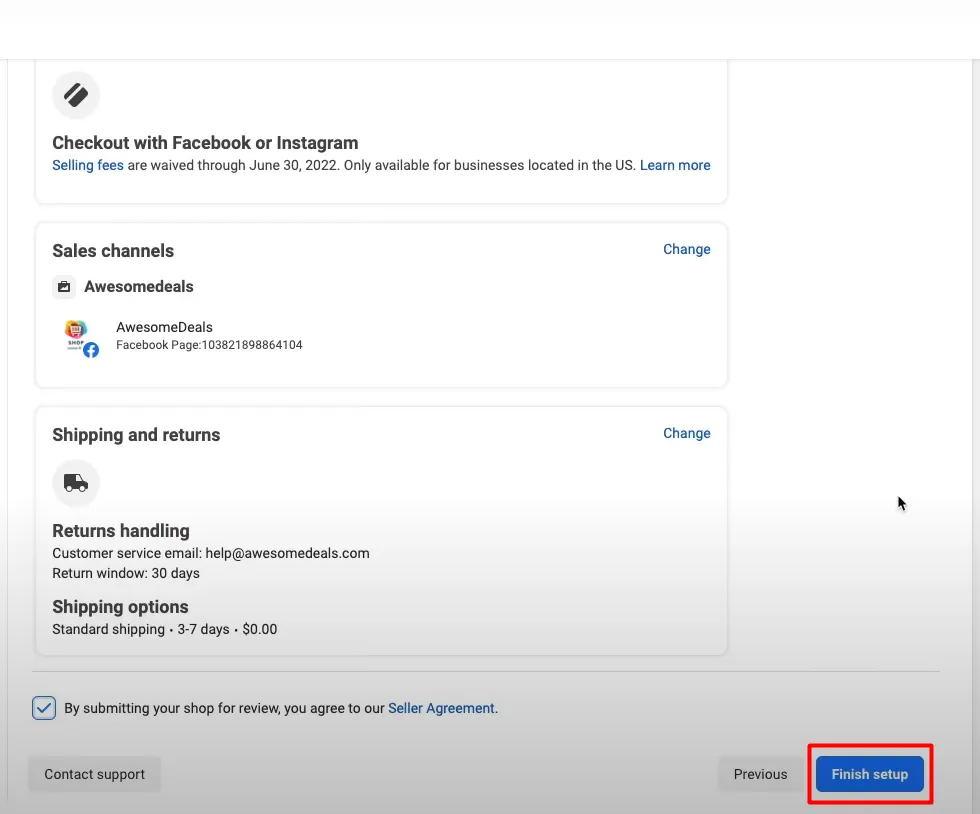
You’ve come half the way through the process! It’s time to review your Facebook Shop information, from payment methods to sales channels and shipping & return policies. If you are happy with the details, agree to the Seller Agreement then hit the Finish setup button.
#3. Manage your catalog
Congratulations, your very owned Facebook Shop has just been successfully created! At this stage, you will be directed to the Commerce Manager to add products to your catalogs or create collections to logically arrange your Facebook store.
Add Products to your Facebook Shop
You can manually add products, upload them in bulk, or use the Catalog Batch API to add items. If you’ve already posted products to Facebook, you’re almost set up and ready to go. You may also be able to import products from your eCommerce stores to Facebook Shop directly if you’ve synced them together earlier on.
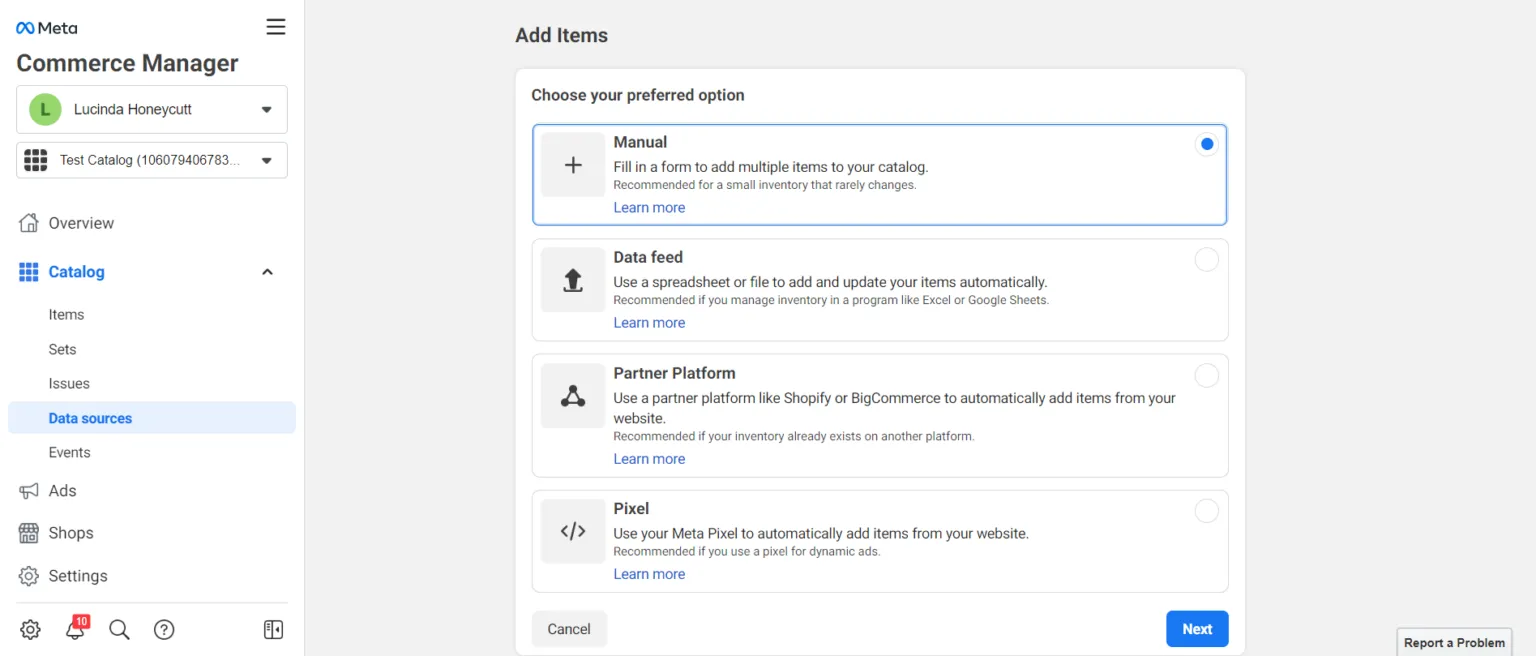
Follow the below instructions to manually upload your products to your Facebook Shop:
- From the Commerce Manager dashboard, click on Add items > Manual.
- Fill in the details for each item, including the title, product description, and price. You can also add links for your products if you currently own a website, and don’t forget to upload images and videos to visualize your products.
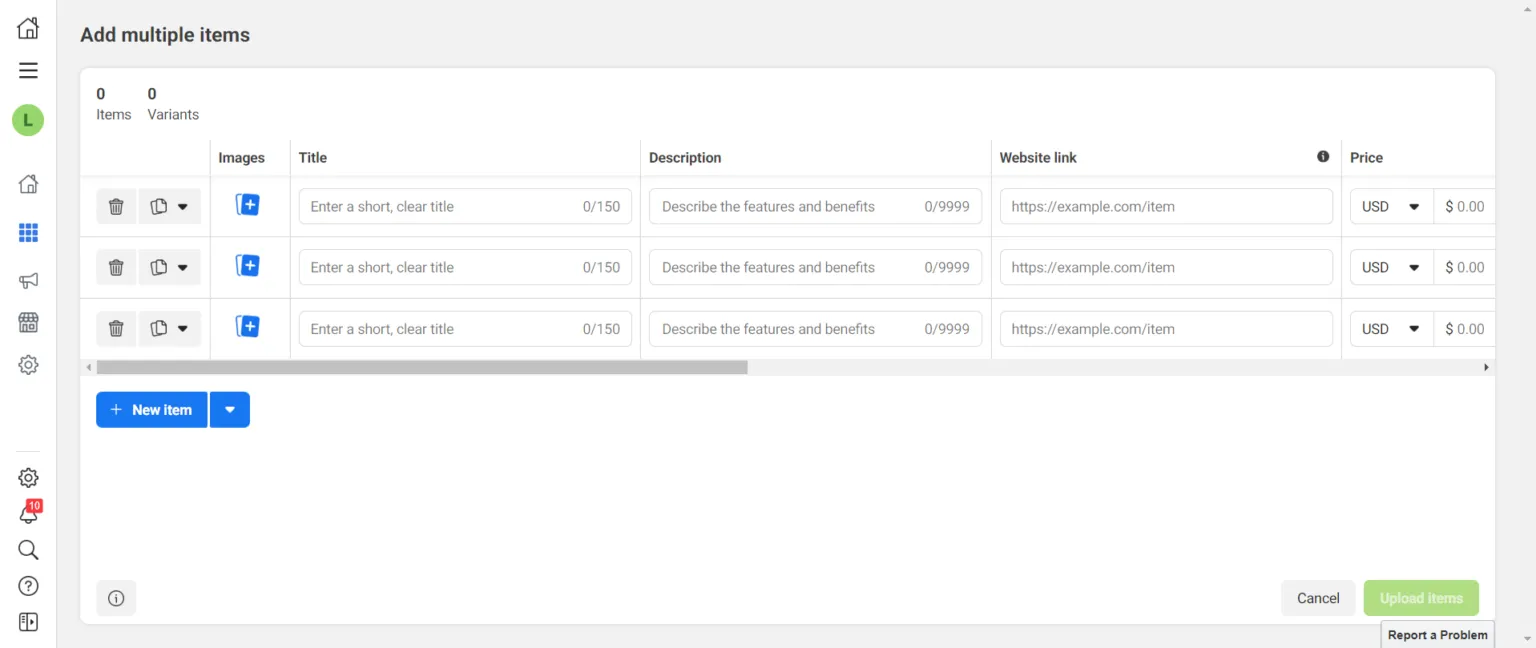
- Click on Upload Items once you finish.
Create collections
Collections are groups of certain products gathered for an easy browsing experience on any Facebook store. You can categorize your products by gender, color, season, trends, etc… to target different audiences. With that, your customers will be able to find the desired items more easily.
Follow the instructions below to create a collection in 4 simple steps and arrange your store in a logical way:
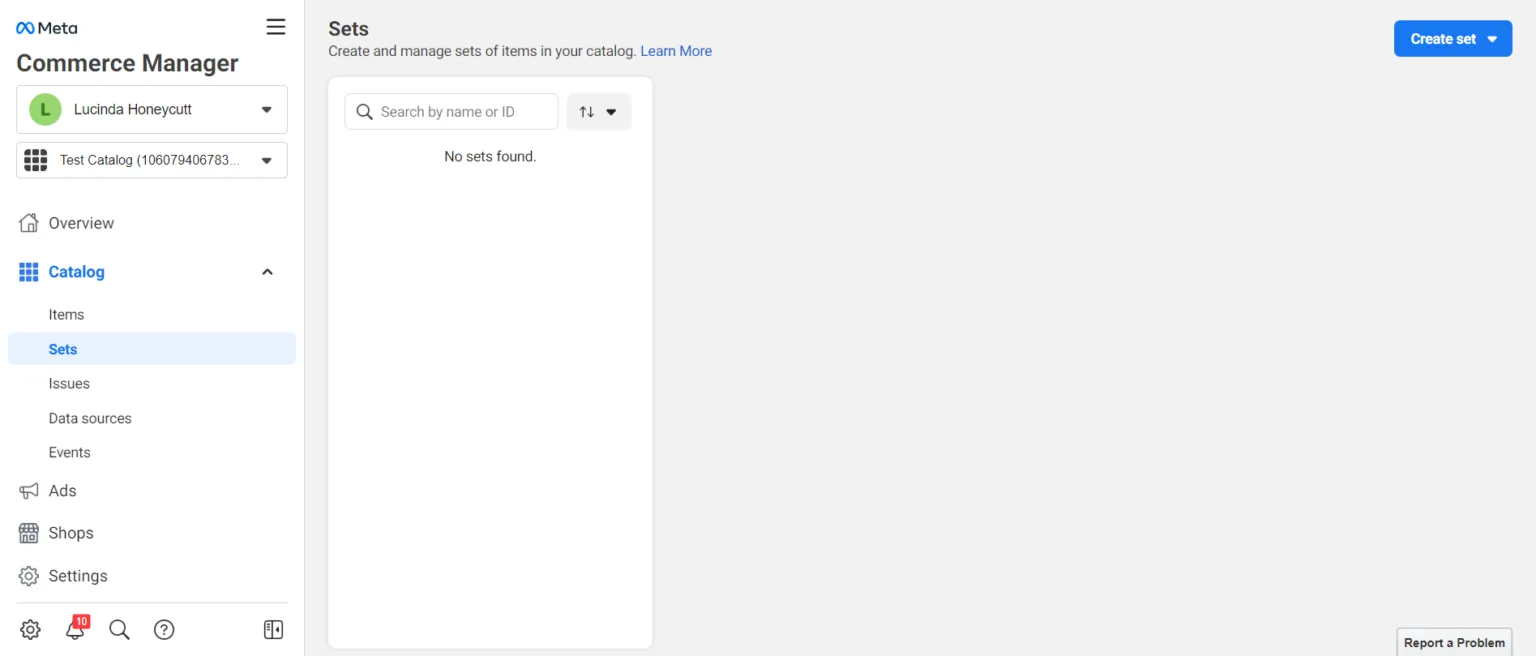
- From the Commerce Manager Dashboard, choose Catalogs > Set.
- Click on Create set button in the top right corner.
- From here, enter the collection name in the Set name section, then add the items from the current catalog. You can pick the items manually, or use the Search catalogs to speed up the process.
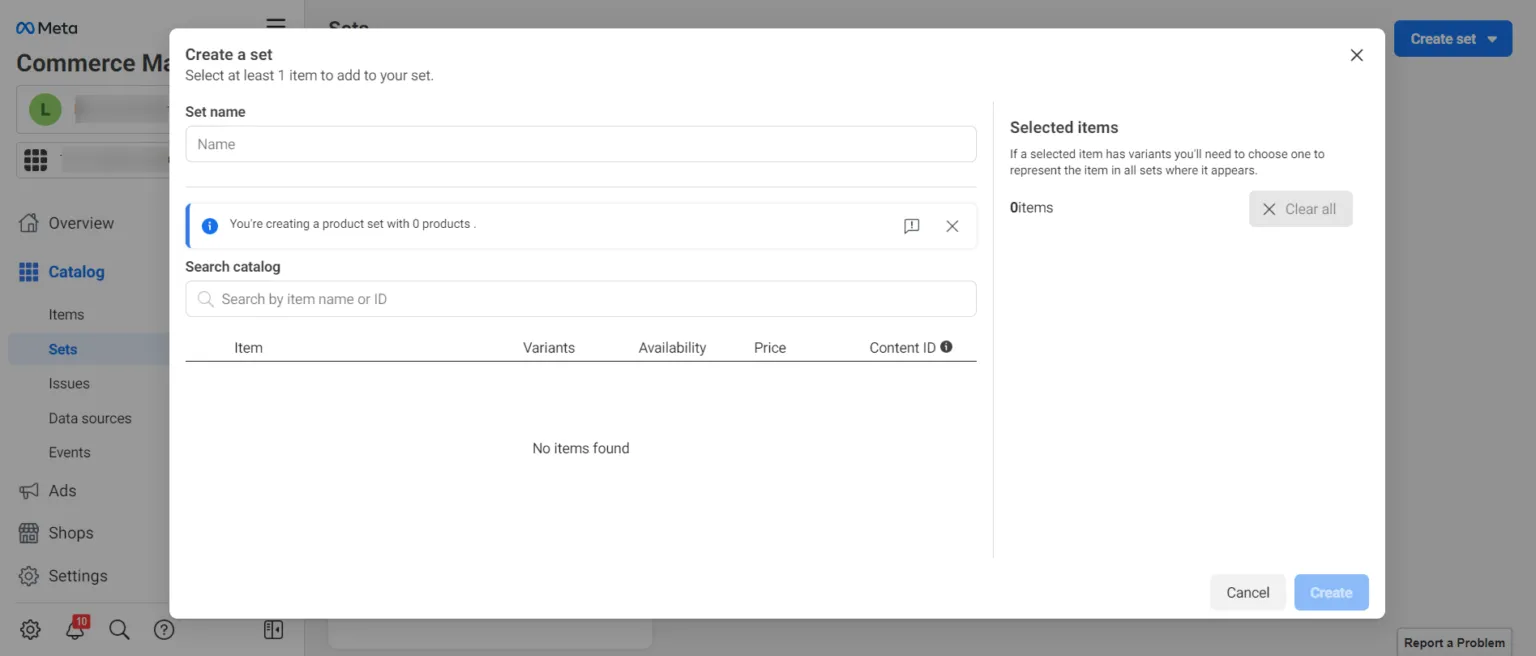
- Hit Create when you’ve finished selecting the items for your collection.
#4. Customize your Facebook Shop
You can change the layout and design of your Facebook Shop to make it look more professional and synchronize your online presence.
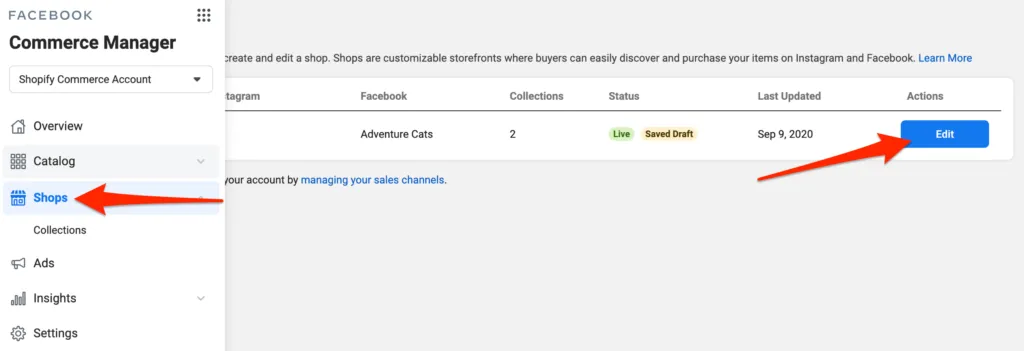
- From your Commerce Manager dashboard, navigate to the left-hand menu.
- Select Shop and hit on the Edit icon.
From here, you can click on Layout to add or remove prominent collections from your Facebook Store. On top of that, you can drag and drop them into the desired order by clicking on the 6-dot sections (on the right side of a collection) and dragging them to wherever you want.
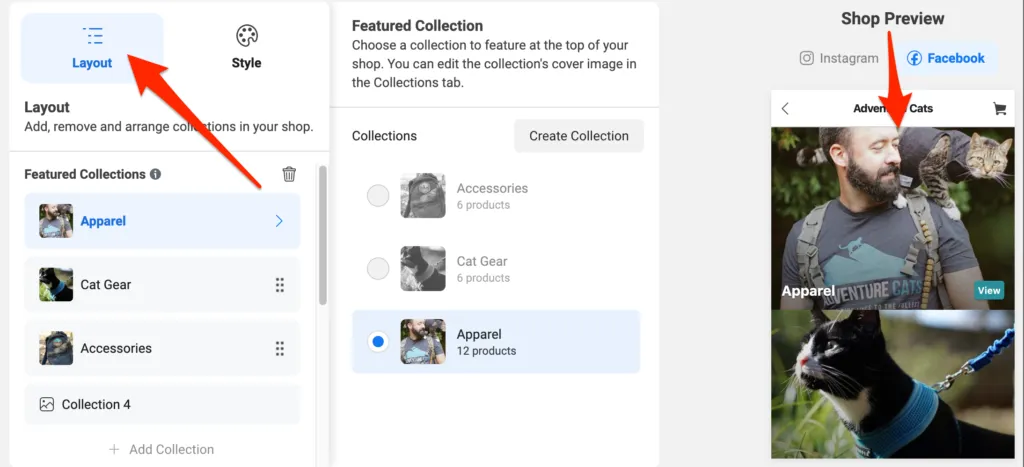
It’s simple to catch up with the newest adjustments you just made to the Facebook Shop by looking at theShop Preview section on the right corner of the screen. It’s also straightforward to edit texts and buttons, both size and color, just by a single click to Style in the right-hand navigation.
#5. Publish your shop
When you are satisfied with the look and feel of your Facebook store, click on the Publish button. People will be able to view the products and collections once Facebook finishes reviewing your Facebook Shop. Normally, the Facebook review duration might take up to 24 or 48 hours.
5 Tips for a Successful Facebook Shop
Learning how to start an online boutique on Facebook is not enough. You have to learn how to sell on Facebook smoothly and make the most out of your Facebook online store. If you have yet to come up with an idea, check out our 5 amazing tips below.
Use high-quality and eye-catching images
Lifestyle photos and product photos play a vital role in attracting potential customers, particularly with collections.
The hero image is the major photograph that appears as the collection’s main photo. It should not just include the collection’s products, but also be consistent with your brand. Consider how your chosen hero image will display on mobile, and always test it. Avoid using stock imagery and think of making creative images for your own.
Put your best items on display
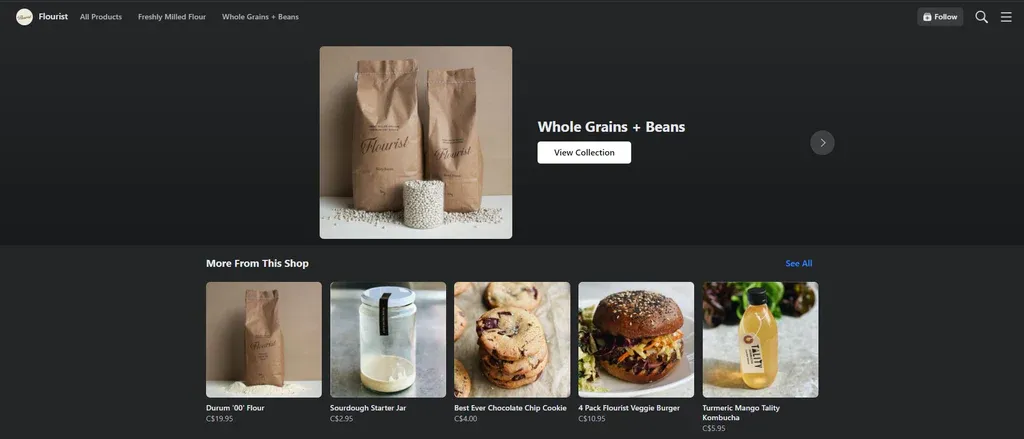
When your customers visit your Facebook Shop, what first catches their attention are the featured products or those which are put on top of your page. To take advantage of this selling opportunity, you should highlight the top products of the store and give them all the spotlight they need. Put the products you want to promote on the most attractive corners to make sure that every customer sees them when browsing your store.
You can also create a collection of your best-selling items and put it at the top of your Facebook Shop. It not only increases trust but also contributes to the FOMO (fear of missing out) effect by generating the following concerns. “Why do these products get a thousand buys?”, “Are they that good?”. Curiosity kills the cat somewhere else, and here, it is the key factor in converting a window shopper into a buyer.
Check your comments section regularly
With the booming of online shopping over the last few years, customer service becomes increasingly vital to any eCommerce business. It also applies to Facebook Shop businesses, and there’s nothing more important than making your buyers happy with your products (then turning them into your repeat customers).
Make sure to pay close attention to every comment on your products. It not only shows your attentiveness towards your prospective customers, but it also increases the reach and engagement rate for your posts. Every time you leave a reply to your customers’ comments, your post will again show up on your Facebook Shop’s follower feeds.
No one wants bad reviews, but it can happen anytime, to any business. If that is the case, ask for more details to see if there’s is anything you can do to improve your service or resolve their issues quickly. Even if it’s a baseless comment, answer it politely and give evidence accordingly. Smart customers will not be fooled easily.
Keep track of metrics with Facebook Shop Insights
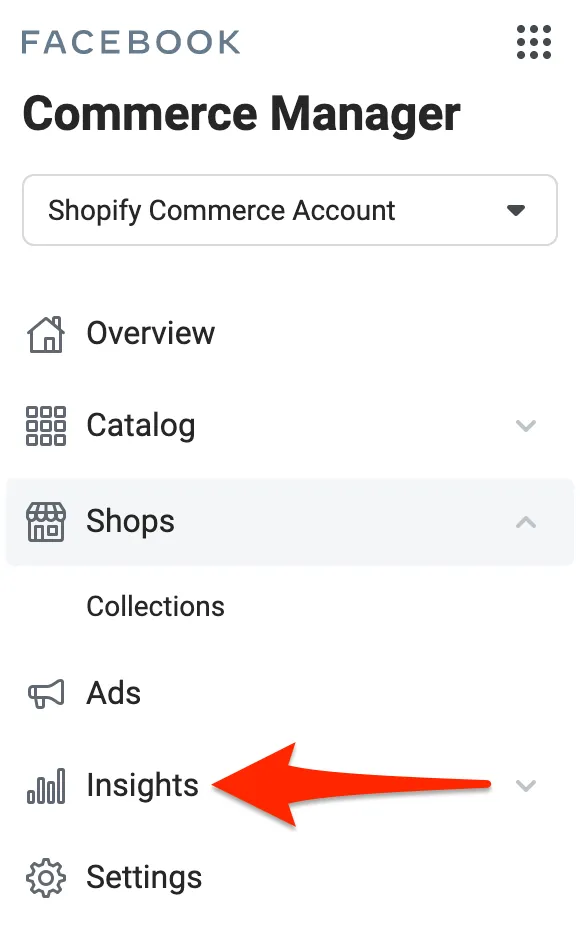
Facebook Shop features an analytics option that helps you to get insights into the performance of your store and how your potential buyers engage with your Shop. From the Commerce Manager’s left-hand menu, select Insights to see this data.
There’s an Overview dashboard that permits Facebook sellers to assess how their shop is doing and spot quickly. Meanwhile, the Products dashboard gives you information about each product you’re selling.
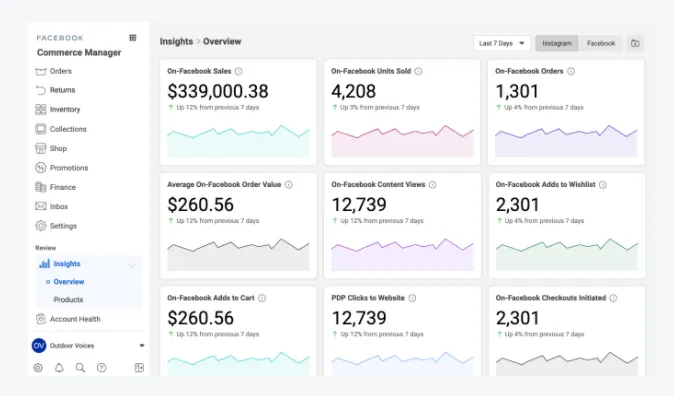
It’s possible to dig deeper into metrics by looking at certain time frames, product listings, and other factors. Keep track of the criteria over time and evaluate the change to make proper amendments accordingly.
Promote your Facebook Shop
Once your Shop is reviewed and accepted by Facebook, your current followers can opt-in to see your products and see if there is anything that interests them. But if you want to reach new customers, you might probably want to launch advertising campaigns for your Facebook Shop.
To do this, click on Ads on the left-hand menu in your Commerce Manager dashboard. From here, you can either choose to run a traffic or dynamic ad.
Facebook Shop traffic ads
With traffic ads, you can drive your users to your website, app, or even a Messenger conversation. For instance, you can direct potential customers to message you about finding their perfect fit at your clothing store, providing that you have at least 4 products in the catalog.
Facebook Shop dynamic ads
Meanwhile, dynamic ads rely on machine learning to provide users with appropriate deals based on their preferences and actions. Rather than generating a separate ad for each product in your catalog, you can create a single campaign that promotes all of your products. This ad campaign must base on what each customer is most likely to buy. When a user expresses interest in a product, Facebook will create an ad for them and deliver it to their mobile, tablet, or desktop devices immediately.
According to Facebook recommendations, you need to have at least 20 products for sale in your Facebook store to create dynamic ads.
Final Words
Your eCommerce business may present and already be advertising on Facebook, but your customers will be unable to purchase the products directly from your Shop until you learn how to start an online business on Facebook.
If you have a product inventory and currently selling on your Facebook Page or running an eCommerce site, creating collections and customizing your Facebook Shop won’t take long. In fact, you might be up and running and selling in a blink of an eye.
